ReefLogic Administration Manual
This manual is the operator reference for the ReefLogic admin desktop client — the Qt application that manages a ReefLogic admin server. It covers every screen, dialog, and workflow exposed by the app, in the order an operator typically encounters them.
You will use this app to: connect to one or more admin servers, bootstrap a freshly deployed server, manage tenants and their identity providers, author admin roles and permissions, attach permission grants to roles, and add or revoke admin operator identities.
This manual is paired with the Deployment Guide — that guide brings the server stack up; this one runs it.
At a glance
| Area | Where to find it | What you do there |
|---|---|---|
| Connection profile | File → New connection… then File → [profile] → Select | Persist server endpoints (hostname, port, TLS mode) so you can switch between them. |
| Server bootstrap | Setup → Bootstrap server… | Initialise a freshly deployed server: install secret, IdP, first admin, recovery PIN. |
| Admin profile | Profiles → New profile… then Profiles → [profile] → Select | Capture a personal OIDC identity tied to the server's admin IdP. |
| OIDC settings | Toolbar toggle OIDC Settings | View and edit the singleton admin OIDC provider used by every operator. |
| Roles | Toolbar toggle Roles | Create, copy, edit, delete platform-administration roles. |
| Permissions | Toolbar toggle Permissions | Browse the admin permission catalogue (read-only). |
| Grants | Toolbar toggle Grants | Tie permissions to roles with a CRUDX mask. |
| Tenants | Toolbar toggle Tenants | Create tenant rows, configure their per-tenant identity providers, retire them. |
| Status bar | Bottom of the main window | Endpoint, connection state, TLS lock, and the outcome of the last RPC. |
The session toolbar shows the OIDC Settings, Roles, Permissions, Grants, and Tenants toggles only after the server has been bootstrapped — they stay disabled on a freshly connected, uninitialised server.
Navigation overview
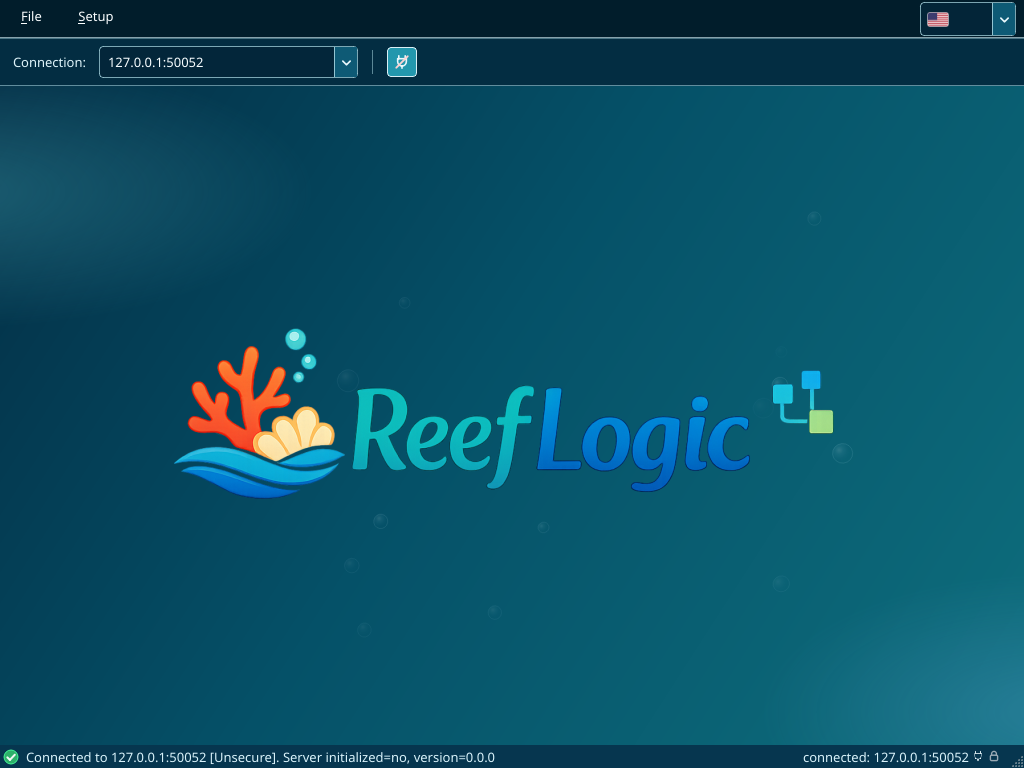
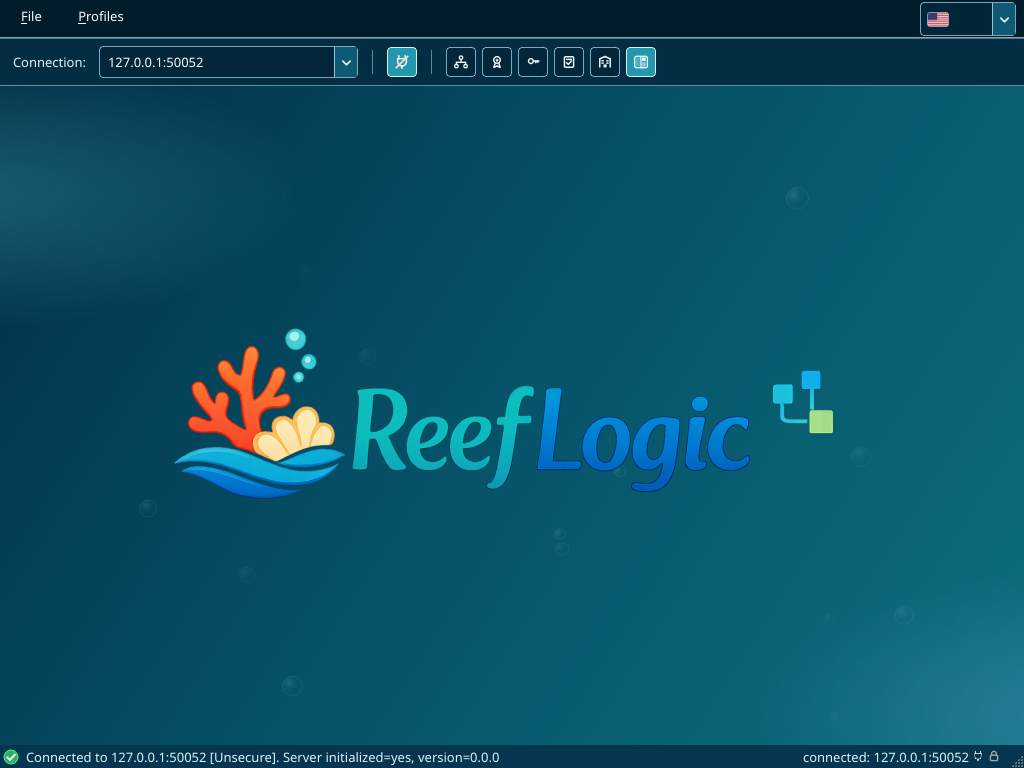
The application opens to the main window — an ocean-blue shell that hosts:
- a menu bar with
File,Setup, andProfilesmenus; - a session toolbar below the menu with the connection profile selector, a connect/disconnect toggle, the five management-domain toggles listed above, and a workspace-mode toggle (embedded tabs vs. floating windows);
- a central workspace that switches between an ocean backdrop (no domain selected), a single full-width management panel (one domain selected), and a tabbed panel (two or more domains selected);
- a status bar showing a severity icon, the last message, the endpoint label, and a TLS lock icon (gold when the channel is TLS or mTLS, grey when plain).
The first time the application launches, it goes straight to the New Connection dialog because no connection profile has been saved yet.
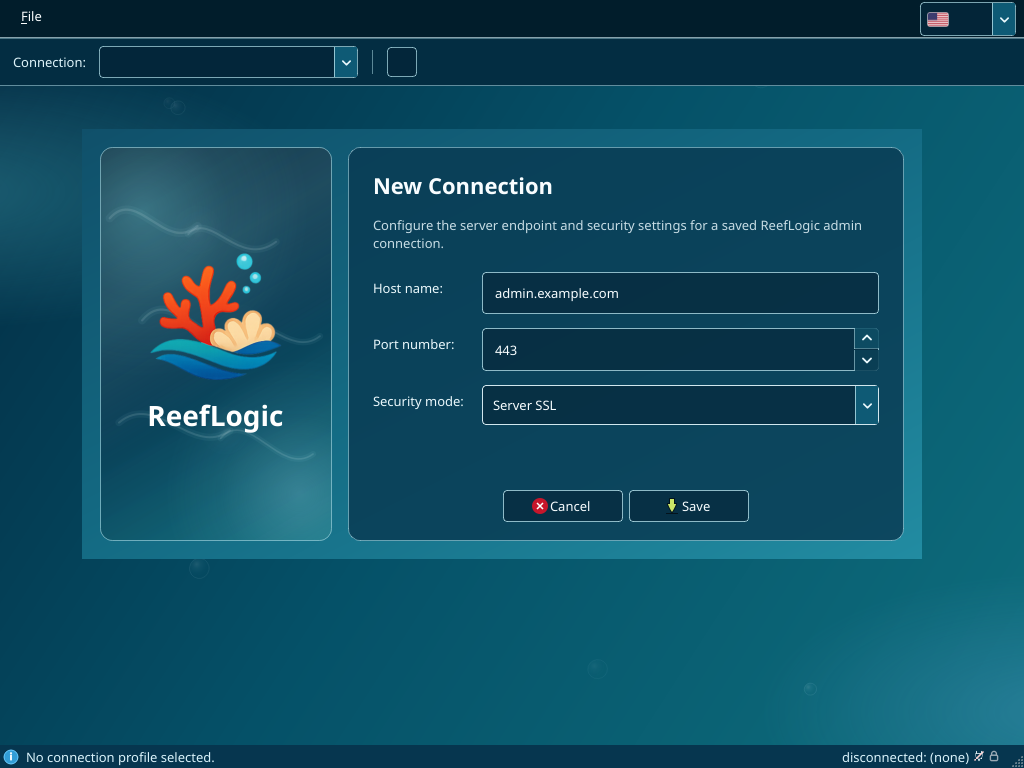
1. Create a connection profile
A connection profile is the recipe the client uses to reach a server: hostname, port, transport mode, and (for mTLS) the path to a client certificate. Profiles are persisted to your user-level Qt settings, so they survive restarts.
Open the dialog
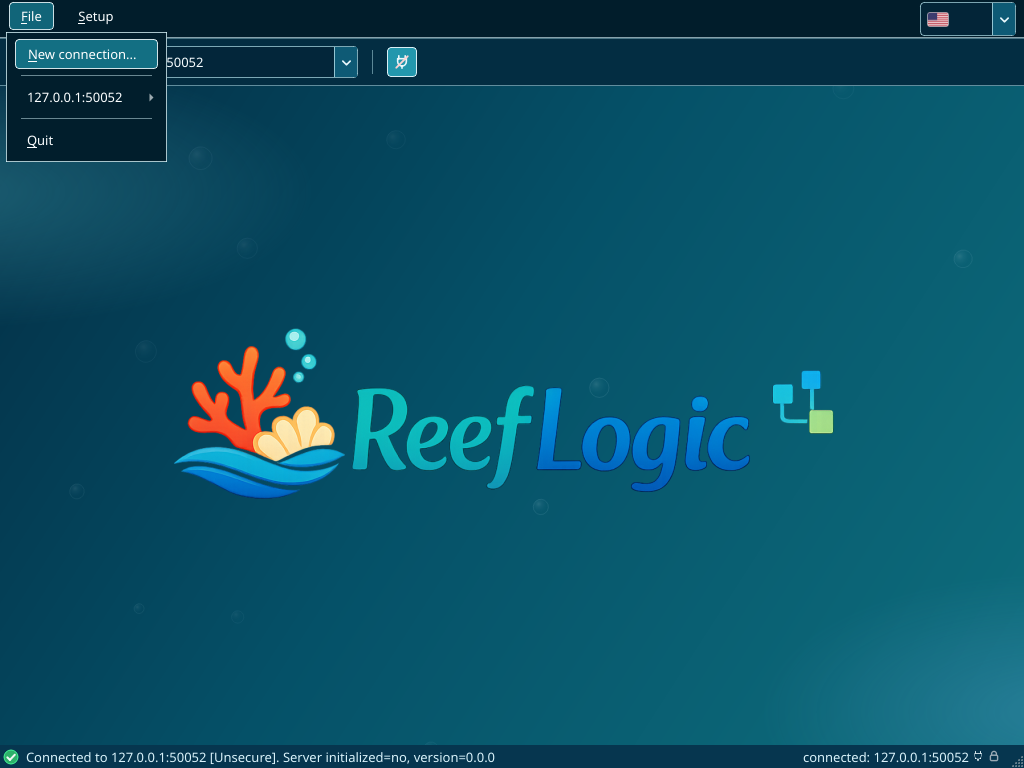
- File → New connection…
Fill in the fields
| Field | Type | Notes |
|---|---|---|
| Host name | text | DNS name or IP of the admin server (for example admin.example.com). |
| Port number | spin box | gRPC port on the host HAProxy. Public TLS deployments use 443. |
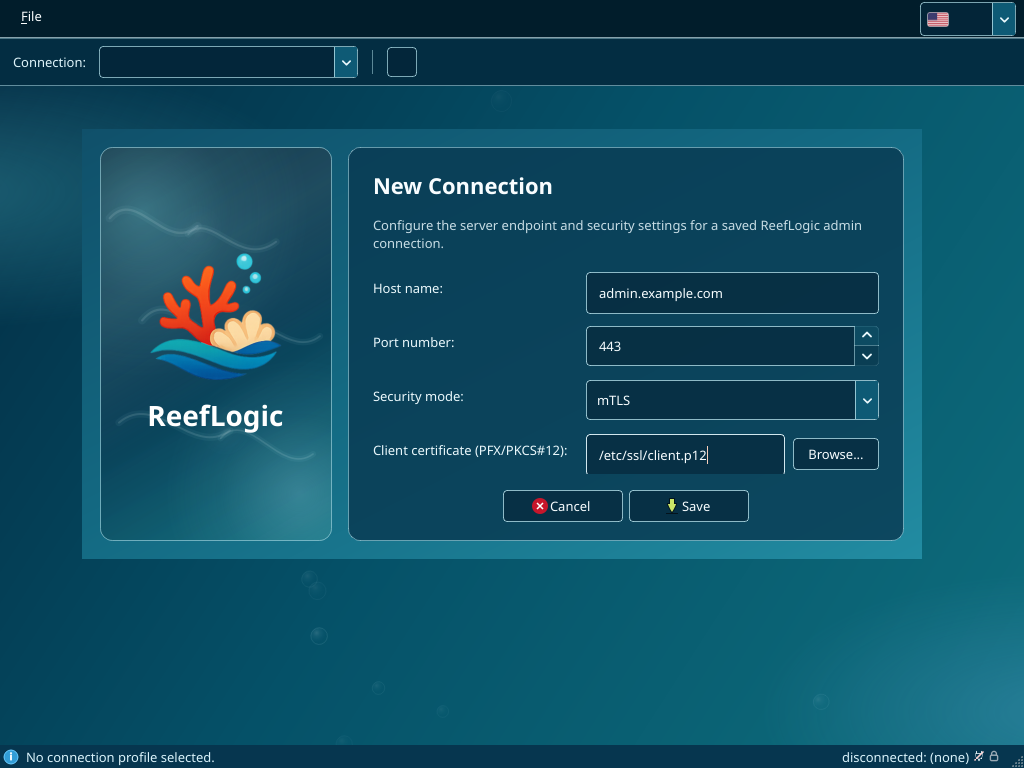
| Security mode | drop-down | Unsecure (loopback / dev only), Server SSL (production default), or mTLS. |
| Client certificate (PFX/PKCS#12) | file picker | Visible only when mTLS is selected; absolute path to a .p12 / .pfx client cert. |
In mTLS mode the Client certificate (PFX/PKCS#12) row appears with a path field and a Browse… picker:
Save and switch
Click Save to persist the profile. The new profile appears as a submenu under File → [profile] with two actions:
- Select — apply this profile (the client immediately probes the server)
- Delete — remove the saved profile (disabled while the profile is active)
Switching profiles disconnects the current channel and rebuilds it against the new endpoint.
If you chose mTLS, you will be prompted once per process for the PKCS#12 passphrase. The passphrase is held in memory only — it is never written to disk.
2. Status bar and connection lifecycle
The status bar at the bottom of the main window is your single source of truth for connection state. A typical sequence after Selecting a profile looks like:
Probing server…— the gRPC channel is being dialled andReefStatusService.is_initializedis being called.- Either
Connected to <host>:<port> [<mode>]. Server initialized=yes, version=<v>(the typical end state on a running deployment) orConnected to <host>:<port> [<mode>]. Server initialized=no, version=0.0.0(a freshly deployed server waiting for the bootstrap wizard). - On error, a red entry such as
Failed to connect: DEADLINE_EXCEEDEDorTLS handshake failed: certificate verify failed. The client retries with exponential backoff; you can also retry manually with the connect/disconnect toggle.
The endpoint label on the right of the status bar always shows the currently selected profile's hostname:port and a gold/grey TLS lock for at-a-glance security mode.
3. Bootstrap a fresh server
If the status bar shows server NOT initialised, Setup → Bootstrap server… opens the Initial Setup Wizard. This single multi-step flow brings a freshly deployed admin server to a usable state: it sets the singleton admin OIDC provider, captures your first admin operator's OIDC identity, and (mandatorily) escrows a recovery PIN.
The wizard has five pages, walked in order.
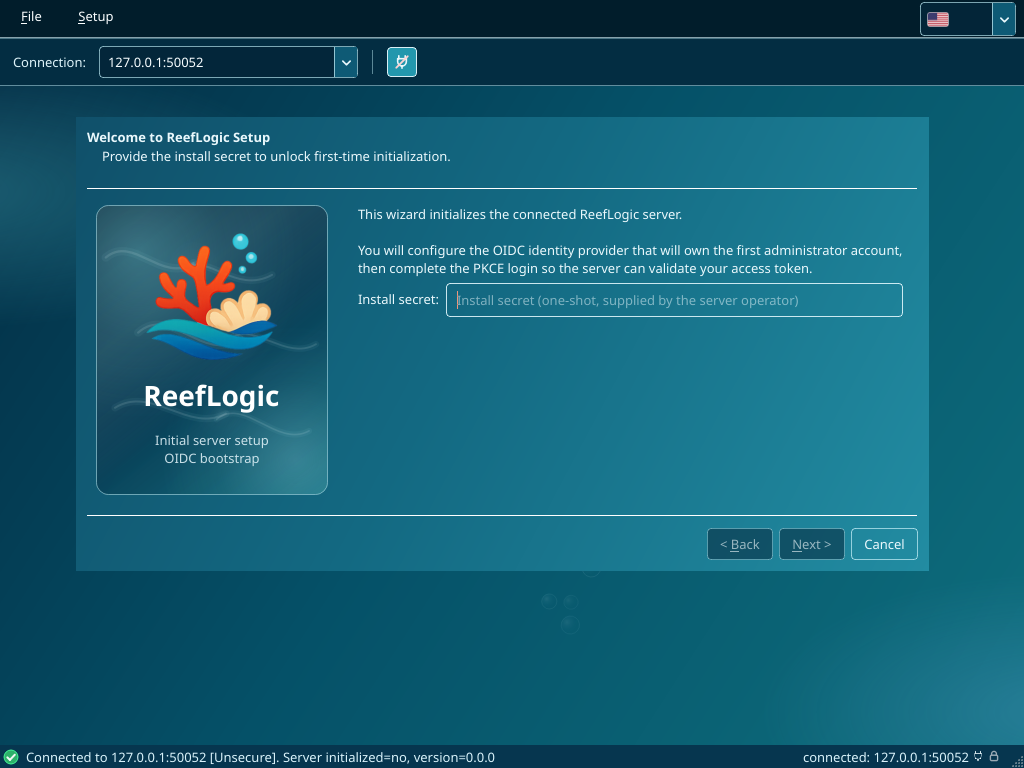
3.1 Welcome — install secret
You need the install secret from whoever deployed the server — it is the one-time bootstrap secret stored as reef_init_auth_shared_secret in the server's reeflogic_admin.conf. The wizard accepts it in a password field.
3.2 IdP configuration
You describe the IdP that will authenticate the first administrator. The wizard pre-fills sensible defaults; for a stock Keycloak deployment you typically only have to set Issuer URL, Client ID, and Audience.
| Field | Required | Purpose |
|---|---|---|
| Issuer URL | Yes | IdP issuer URL (for example http://localhost:8099/realms/ADMIN). |
| Client ID | Yes | Public client identifier registered at the IdP for the admin client (Keycloak demo realm: reeflogic-admin-cli). |
| Audience | Yes | Audience claim the IdP mints into admin tokens — must match the value the audience mapper produces (Keycloak demo realm: urn:reeflogic:admin). |
| Requested scopes (space-separated) | No | OIDC scopes requested at authorisation time. Defaults to openid profile email offline_access. |
| Redirect URI template | No | Wizard loopback redirect template; {port} is filled with the random port the wizard binds. |
| Groups claim name | No | JWT claim name that carries the operator's IdP groups, used by group-grant resolution. Defaults to urn:reeflogic:roles. |
| Token verification mode | Yes | Auto (try JWT, fall back to userinfo/introspection), JWT-only, userinfo, or introspection. |
| Introspection client id / secret | No | Credentials the server uses when calling the introspection endpoint (opaque-token mode). |
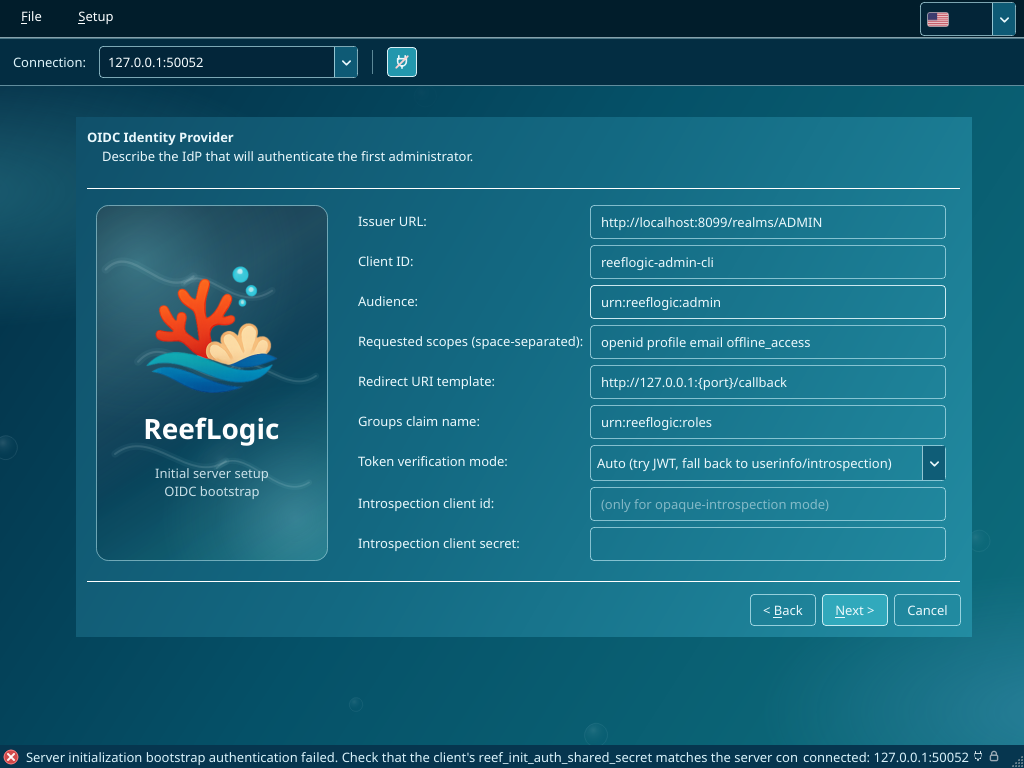
The post-bootstrap OIDC Settings screen (chapter 6) exposes the full set of overrides — discovery URL, JWKS URL, UserInfo URL, Introspection URL, clock skew, connect/read timeouts, and userinfo/introspection fallback toggles. The bootstrap wizard's IdP page is the trimmed first-time-setup form.
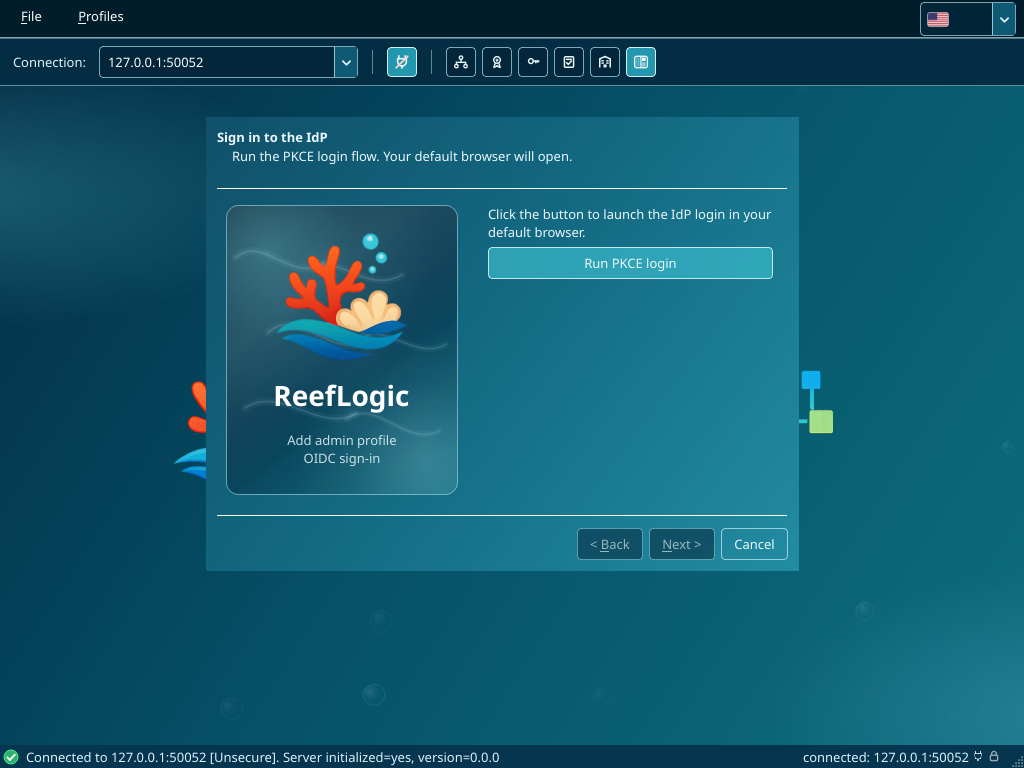
3.3 PKCE login
The wizard now needs your operator identity. Click Run PKCE login — your default browser opens at the IdP's authorisation endpoint, with a PKCE code_challenge, a random state nonce, and a redirect URL pointing at the wizard's loopback listener (http://127.0.0.1:<random-port>/callback).
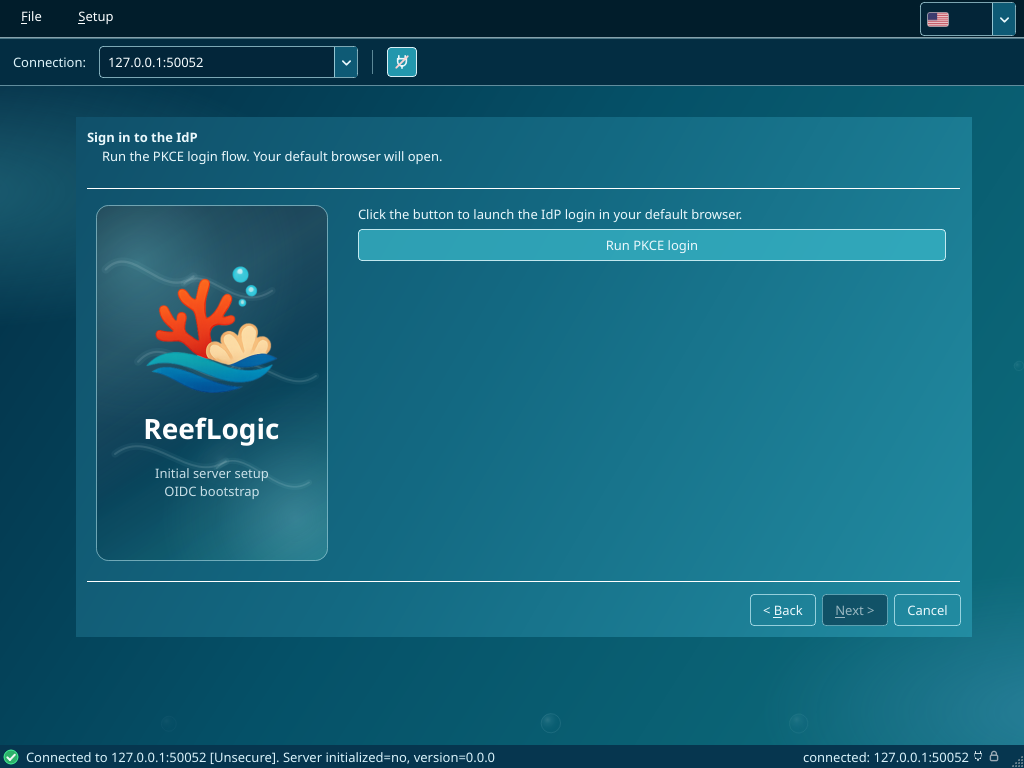
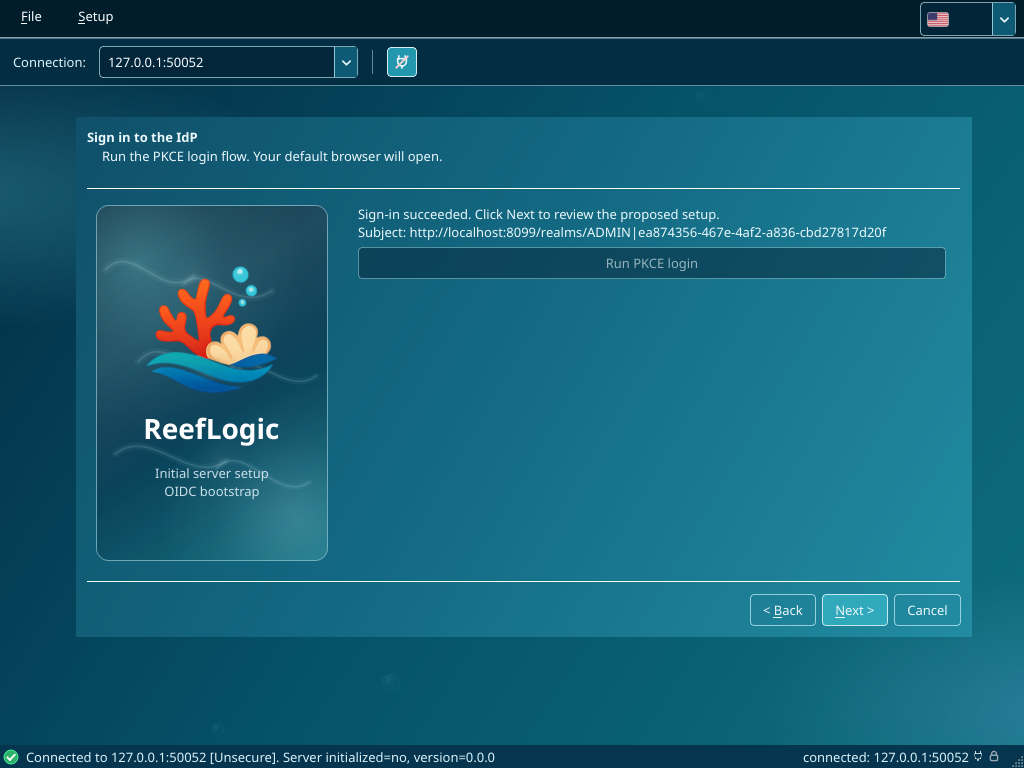
Log in at the IdP. The IdP redirects back to the loopback URL; the wizard intercepts the redirect, verifies the state nonce, and exchanges the authorisation code for tokens at the IdP's token_endpoint. Success is signalled in the wizard as Sign-in succeeded. Click Next to review the proposed setup. with the OIDC subject shown below. Any failure (timeout, IdP error, network failure, state mismatch) is shown verbatim and the wizard returns you to this page so you can retry.
The redirect URI configured at the IdP for your admin client must match the
REEFLOGIC_ADMIN_REDIRECT_URIS_JSONyou supplied at deploy time (the wizard's loopback URLs all match thehttp://127.0.0.1:*/*pattern).
3.4 Recovery PIN
This page is mandatory for the bootstrap flow. The wizard generates a recovery PIN, shows it masked behind a reveal toggle, and exposes a Copy to clipboard button. You must tick I have saved the PIN somewhere safe before Next is enabled.
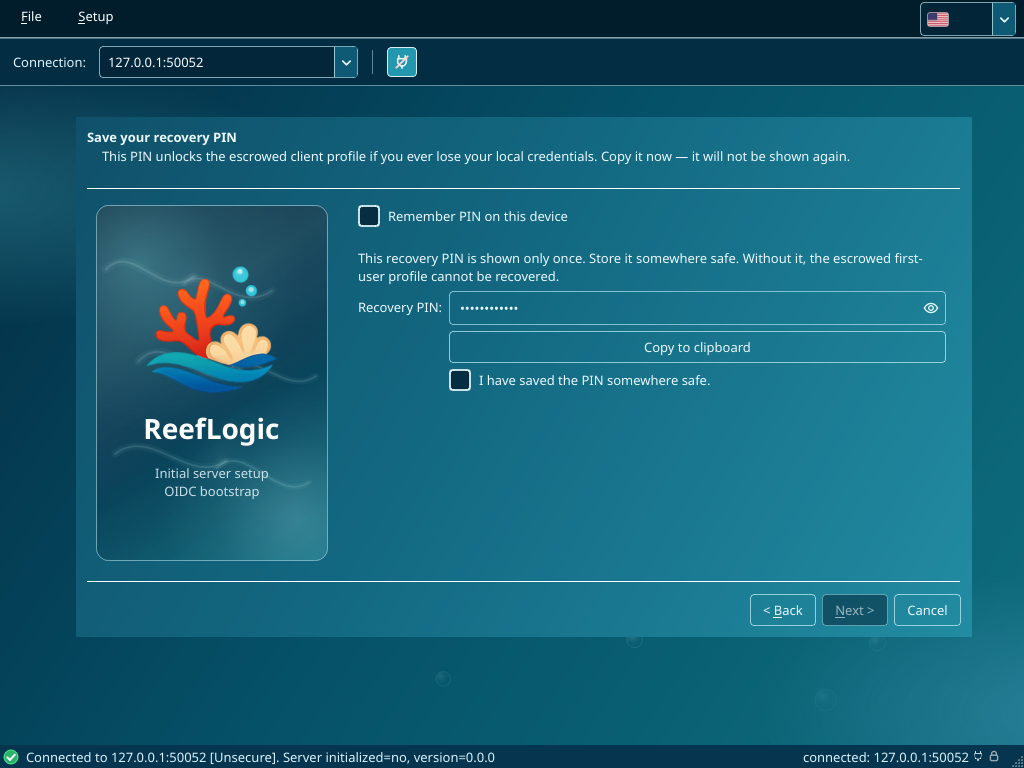
The PIN is used to encrypt your saved admin profile (and the refresh token inside it) when it lands on disk. Write it down, store it somewhere out-of-band (password manager, sealed envelope, hardware token) — losing it means you cannot revive your saved profile from another device. Tick Remember PIN on this device only on a workstation you trust to keep the PIN at rest.
3.5 Review and finish
The wizard displays a read-only summary of every value collected: install secret status (masked), issuer, audience, token mode, IdP endpoints, your subject ID and display name, and confirmation that the recovery PIN is set. Click Finish — the wizard now:
- calls
ReefInitService.Initializewith all of the above (this is the only call where the install secret is required); - on success, persists the saved admin profile locally, encrypted under your recovery PIN;
- the server flips its
is_initializedflag totrue; - the wizard closes and the main window's toolbar now shows the OIDC Settings, Roles, Permissions, Grants and Tenants toggles.
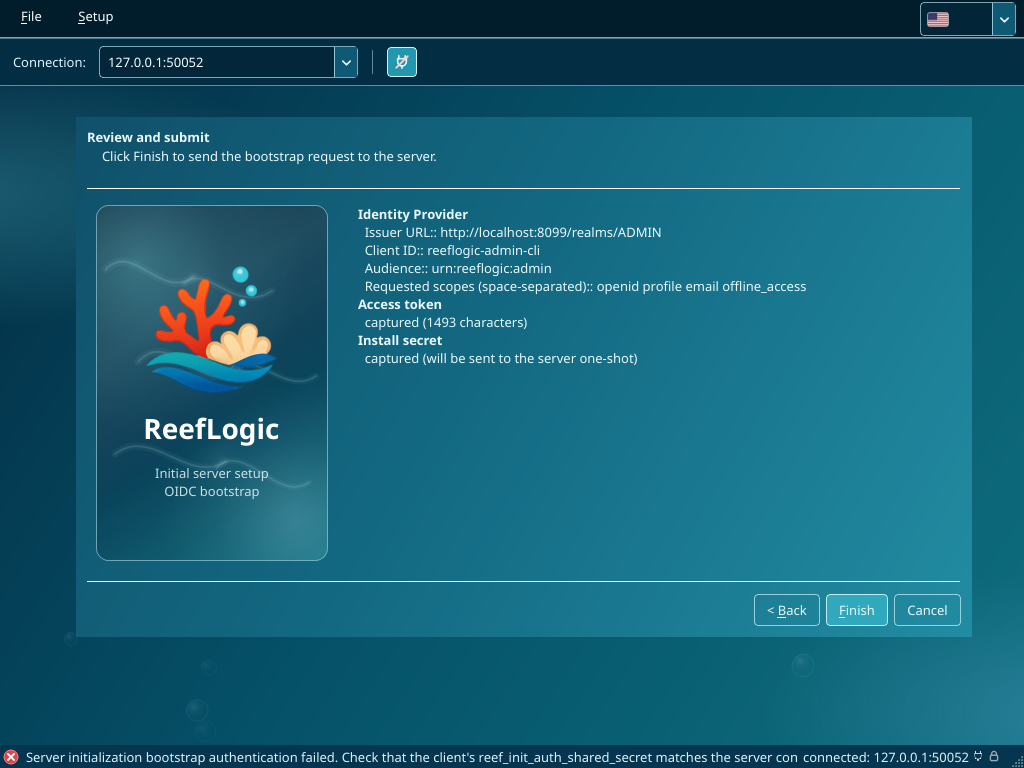
If Initialize fails (most commonly: install secret mismatch, IdP issuer unreachable from the server, audience claim missing on your token), the wizard shows the gRPC error and lets you go back to fix the relevant page. Caveat: the in-app error message currently reports a reef_init_auth_shared_secret mismatch even when the actual cause is an audience-claim mismatch on the bearer token. Check the server log (OidcTokenValidator: token rejected — audience mismatch) before chasing the install secret.
4. Add or switch admin operators
Once a server is bootstrapped, you can add additional operator identities to your local client (or revisit yours from another workstation) via the Profiles menu.
4.1 Create a new profile
Profiles → New profile… opens the Add ReefLogic Admin Profile wizard, which is a trimmed version of the bootstrap flow:
- The welcome / install-secret page is skipped — no install secret is needed once the server is bootstrapped.
- The IdP configuration page is skipped — the new operator inherits the server's current admin OIDC provider (fetched via
ADMIN_COMMAND_OIDC_PROVIDER_VIEW). - The flow opens directly on Sign in to the IdP; click Run PKCE login to authenticate the new operator.
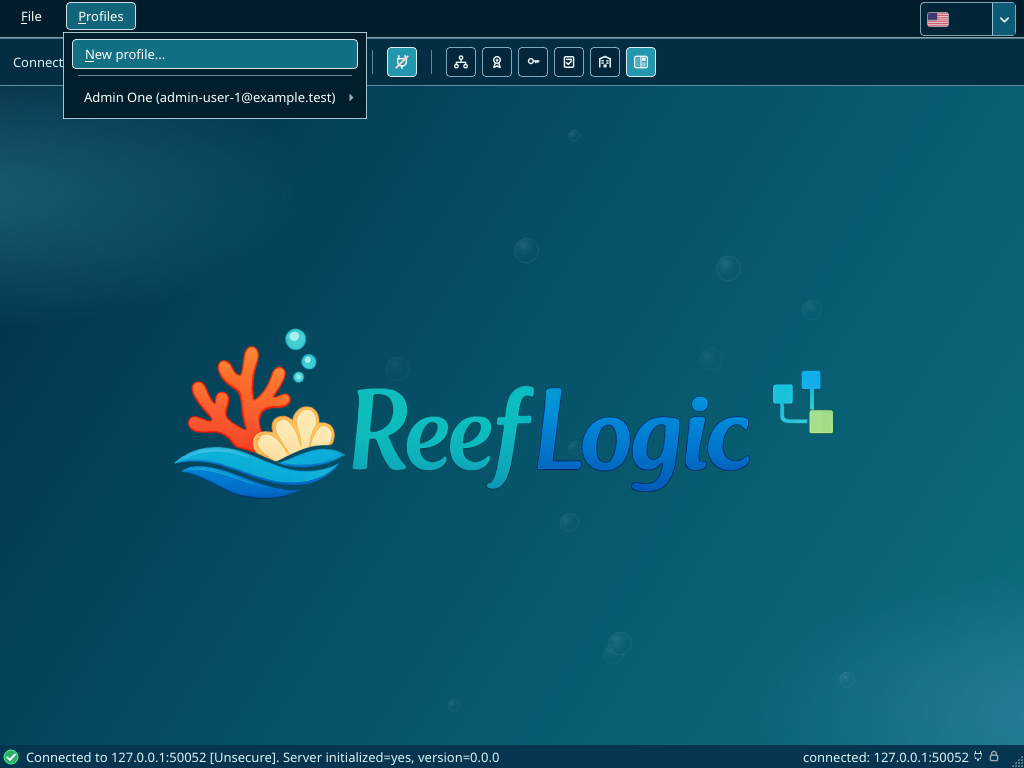
When the wizard finishes, the new profile appears under Profiles → [your name].
4.2 Switch the active profile
The Profiles menu lists New profile… plus every saved operator as a submenu of their own. Each submenu has:
- Select — make this profile the active operator. The client refreshes the OIDC session (using the cached refresh token) and uses the resulting access token for all subsequent RPCs.
- Delete — remove the saved profile and erase its keychain entry (greyed out while the profile is active).
If the cached refresh token is missing or expired when you Select a profile, the client launches the PKCE login flow again to obtain new tokens. Recovery PIN escrow is preserved across refresh — you only need to enter the PIN once per process, when revealing the on-disk profile for the first time.
4.3 PIN prompt
When the client starts and a saved profile's recovery PIN is not yet cached in memory, the Enter Recovery PIN modal appears for the matching profile:
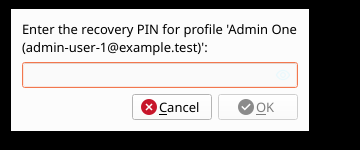
A correct PIN unlocks the saved profile and is cached for the rest of the process. A wrong PIN shows an inline error and lets you retry. Cancel aborts the load — the profile stays on disk but the client cannot use it for this session.
5. Workspace modes
The session toolbar has a Workspace mode button on the right that toggles between two presentations of the management surfaces:
- Embedded tabs (default) — Selected management toggles render inside the central workspace. With one toggle enabled, the workspace shows that surface full-width; with two or more enabled, they share a
QTabWidget.
- Floating windows — Each enabled toggle opens in its own top-level window. Closing the window unticks the corresponding toolbar toggle. This mode is convenient on multi-monitor setups (Roles and Grants on one screen, Tenants on another).

Toggling the workspace mode preserves the active set of surfaces. Toggling all toolbar toggles off returns the workspace to the ocean backdrop.
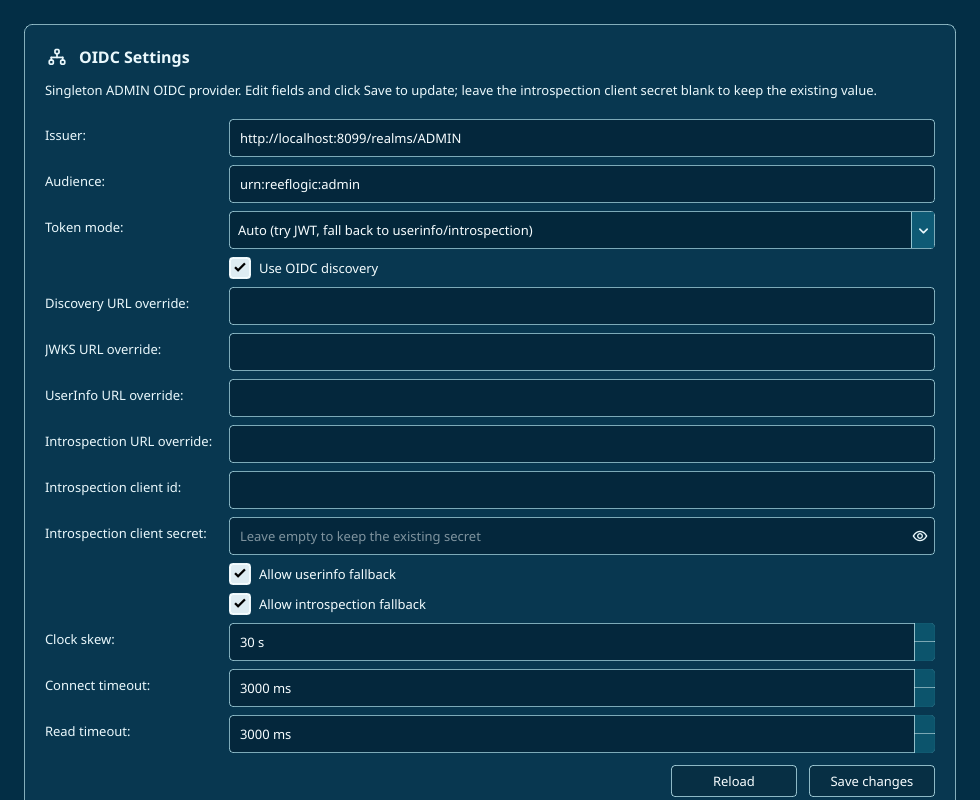
6. OIDC settings
Open the surface via the OIDC Settings toolbar toggle.
The screen shows the singleton ADMIN-scope OIDC provider that every admin login flows through. Subtitle text confirms: "Singleton ADMIN OIDC provider. Edit fields and click Save to update; leave the introspection client secret blank to keep the existing value."
| Field | Notes |
|---|---|
| Issuer | The IdP issuer URL. |
| Audience | Audience claim expected in admin tokens. |
| Token mode | Auto / JWT local / JWT userinfo / Opaque introspection. |
| Use OIDC discovery | Toggle endpoint discovery on or off. |
| Discovery / JWKS / UserInfo / Introspection URL overrides | Each empty unless discovery lookup fails or you need a non-default location. |
| Introspection client ID | Used in opaque-token mode for the RFC 7662 call. |
| Introspection client secret | Blank-keeps-existing semantics: leave the field blank to preserve the stored encrypted value. Type a new value to rotate. |
| Allow userinfo fallback | Falls back to userinfo if local JWT validation fails. |
| Allow introspection fallback | Falls back to introspection if userinfo also fails. |
| Clock skew (s) | JWT validation tolerance. |
| Connect / read timeouts (ms) | HTTP client timeouts for discovery and token endpoint calls. |
Click Save changes to commit the update; Reload discards local edits and re-fetches the current server state. The server applies the update atomically — in-flight requests continue with the old provider, new requests use the new one. Subjects already authenticated remain authenticated until their access tokens expire (the server's subject cache is cleared automatically on provider update).
7. Roles
Open the surface via the Roles toolbar toggle. Roles are platform-administration roles (admin-scope); per-tenant roles live under each tenant and are not editable from this surface.
Toolbar and table
| Element | Purpose |
|---|---|
| Query text | Free-form search across role name and description. |
| Query mode | WEB (multi-word relevance), PLAIN (exact substring), or ILIKE (SQL pattern). |
| Search / Clear | Run the query, or reset to defaults. |
| Add | Open the Create Role dialog (Section 7.1). |
| Update | Open the Update Role dialog for the selected row (disabled until a row is selected). |
| Copy | Open the Copy Role dialog (disabled for TEMPLATE rows). |
| Delete | Delete the selected row after confirmation (disabled for TEMPLATE rows). |
Columns: UUID, Role (internal key), Origin (CUSTOM or TEMPLATE), Template Key, Domain (always admin on this surface), Name, Description, Valid Until. The footer shows page number, page size selector, and total row count.
TEMPLATE rows are the built-in roles shipped by the server (for example
platform-super-admin). They are read-only — only Search and Copy are available on a TEMPLATE row. CUSTOM rows are the ones your team has authored.
7.1 Create a role
| Field | Required | Notes |
|---|---|---|
| Role name | Yes | Display name, up to 64 chars. |
| Description | Yes | Multi-line; explains the role's purpose and scope. |
| Template key | Yes | Stable identifier used when cloning or referencing the role (for example audit-v1). Up to 128 chars. |
| UUID override | No | Custom uuid; must match the rol-<suffix> shape (rol- prefix, ≤ 40 chars). Blank lets the server auto-generate. |
| Valid until | No | UTC datetime picker; blank means no expiry. |
Click Save. The new row appears in the table immediately. Errors (duplicate uuid, malformed override, invalid datetime) surface in the status bar.
7.2 Update a role
The Update dialog is pre-filled from the selected row. UUID is displayed read-only; every other field — name, description, template key, valid until — is editable. The role's identity (UUID) is invariant by design; if you need a different UUID, delete the row and create a new one.
7.3 Copy a role
The Copy dialog presents the same fields as Create, pre-filled from the source row, plus a read-only header Source: <source role name> (<source uuid>). The server-side copy operation is atomic: it inserts the new CUSTOM role and clones every grant from the source onto the new row in a single transaction. The dialog is disabled for TEMPLATE rows because copying a TEMPLATE is the workflow's primary use — you copy a TEMPLATE to start a new CUSTOM role with the template's permission shape.
7.4 Delete a role
A confirmation dialog ("Delete this role? This cannot be undone.") precedes the call. Deletion fails if any grants still reference the role (the cascade is intentionally not configured so you cannot lose permission topology by accident); delete the role's grants first.
8. Permissions
Open the surface via the Permissions toolbar toggle. This surface is read-only: permissions are defined by the server at install time and cannot be created, edited, or deleted from the client.
Toolbar: Query text, Query mode (Web / Plain / ILIKE), Search, Clear. No Create / Update / Delete buttons.
Columns: UUID, Domain (functional area, for example AUTHZ), Name (permission identifier, for example grant, role, tenant), Description.
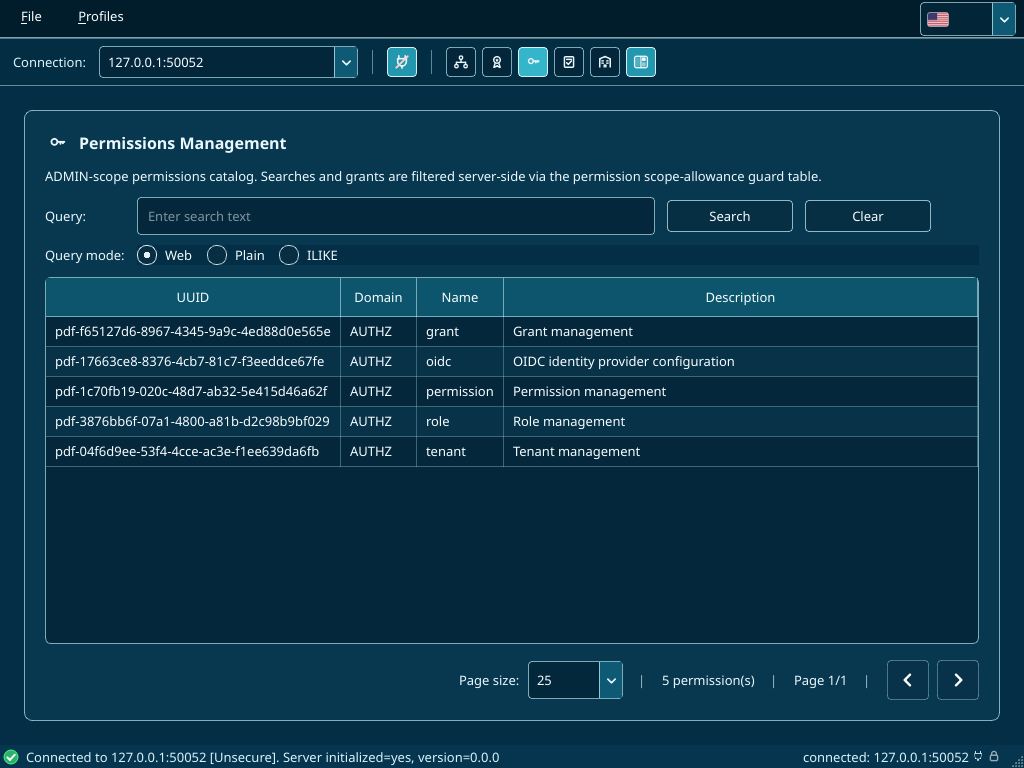
Use this surface to look up the UUID of the permission you want to attach to a role in the Grants surface.
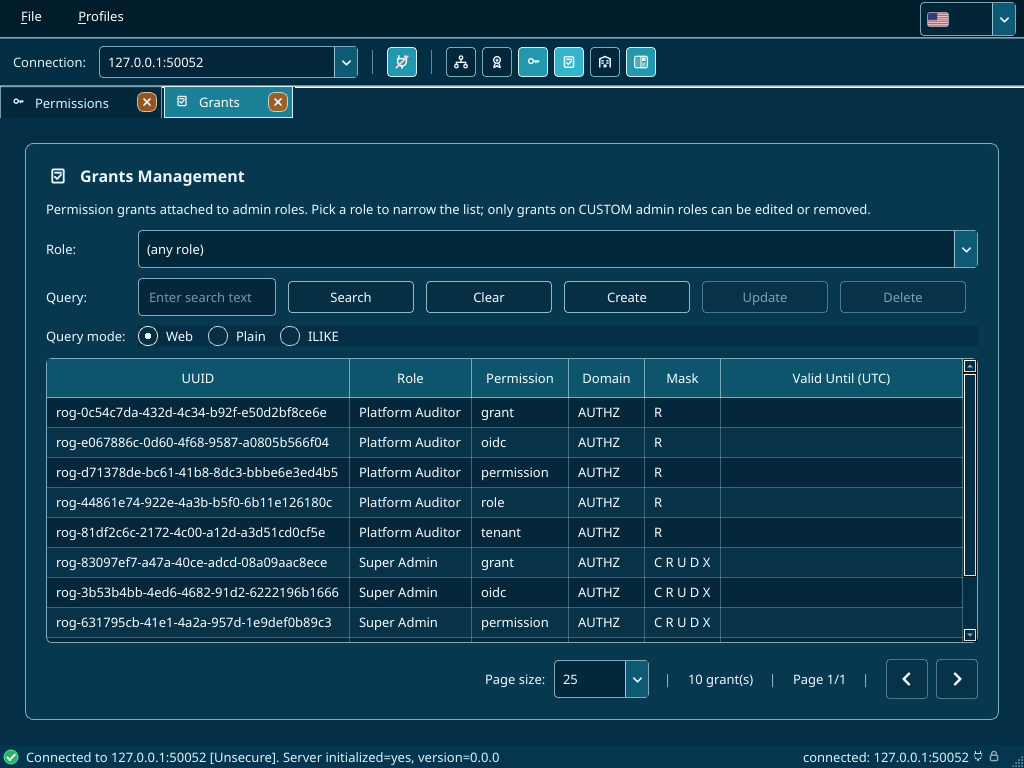
9. Grants
Open the surface via the Grants toolbar toggle. A grant ties one role to one permission with a CRUDX mask — which of Create, Read, Update, Delete, eXecute the role is allowed for that permission.
Toolbar and table
| Element | Purpose |
|---|---|
| Role filter | Drop-down listing every CUSTOM admin role plus (any role). Pre-filters the table. Selecting an entry re-runs the query. |
| Query text | Free-form search. |
| Query mode | WEB / PLAIN / ILIKE. |
| Search / Clear | Run / reset. |
| Add | Open Create Grant dialog (pre-fills the role from the filter, if set). |
| Update | Open Update Grant dialog for the selected row. |
| Delete | Delete the selected grant after confirmation. |
Columns: UUID, Role, Permission, Domain, Mask (rendered as space-separated CRUDX letters, e.g. C R U D X or R), Valid Until (UTC).
9.1 Create a grant
| Field | Required | Notes |
|---|---|---|
| Role | Yes | Drop-down of CUSTOM admin roles (TEMPLATE roles cannot receive new grants). |
| Permission | Yes | Drop-down of every admin-allowed permission. |
| Mask | Yes | Five checkboxes (Create, Read, Update, Delete, eXecute) corresponding to the CRUDX bits 1 / 2 / 4 / 8 / 16. At least one must be checked. |
| Valid until | No | UTC datetime; blank means no expiry. |
Click Save. The new grant appears in the table.
9.2 Update a grant
The role-permission pair is immutable: the dialog shows them read-only and you only edit the mask and the valid-until. To change the role or the permission, delete the grant and create a new one.
9.3 Delete a grant
Standard confirmation, then the row disappears. Deleting a grant takes immediate effect — operators who currently rely on that grant will get PERMISSION_DENIED on their next request once their authorizer cache entry expires (within a minute or two).
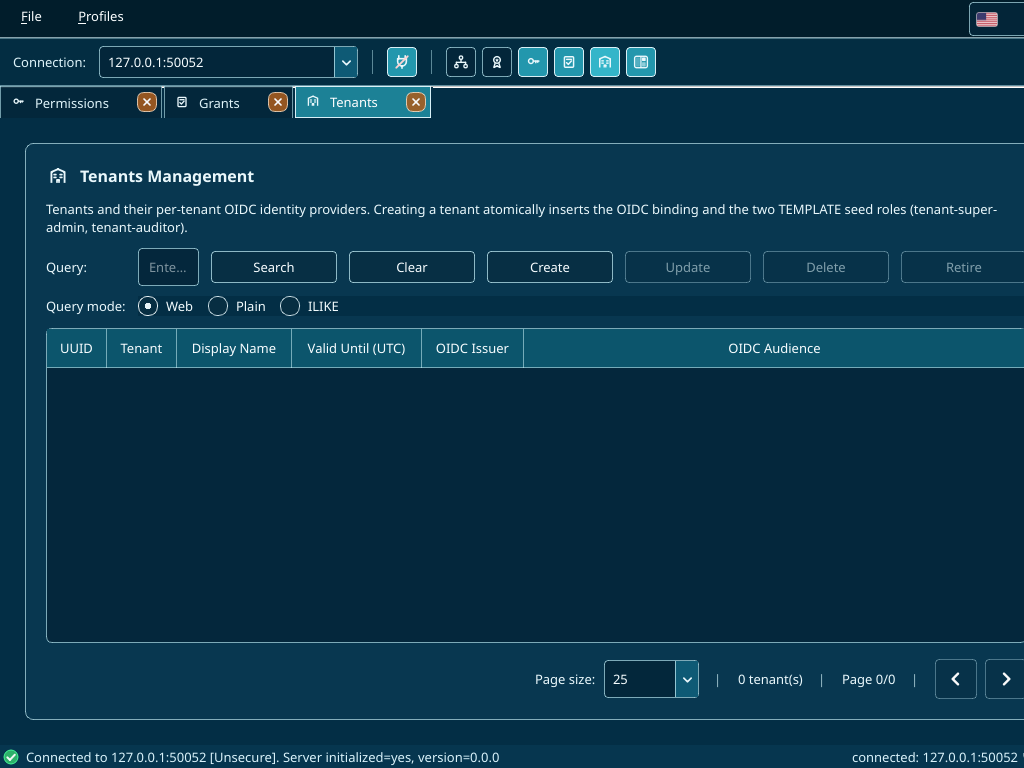
10. Tenants
Open the surface via the Tenants toolbar toggle. Each tenant is a logically isolated namespace with its own OIDC identity provider and its own set of users, roles, and grants.
Subtitle: "Tenants and their per-tenant OIDC identity providers. Creating a tenant atomically inserts the OIDC binding and the two TEMPLATE seed roles (tenant-super-admin, tenant-auditor)."
Toolbar and table
| Element | Purpose |
|---|---|
| Query text | Free-form search across tenant identifier and display name. |
| Query mode | WEB / PLAIN / ILIKE. |
| Search / Clear | Run / reset. |
| Create | Open the Tenant Create Wizard (Section 10.1). |
| Update | Open the Tenant Update Wizard for the selected tenant (Section 10.2). |
| Delete | Hard-delete the tenant and everything under it after confirmation. |
Columns: UUID, Tenant (logical identifier), Display Name, Valid Until (UTC), OIDC Issuer (from the embedded OidcConnection), OIDC Audience.
10.1 Create a tenant
The Tenant Create Wizard is a three-page modal.
Page 1 — Tenant Identity
| Field | Required | Notes |
|---|---|---|
| Tenant | Yes | Internal identifier, ≤ 128 chars, unique. |
| Display name | Yes | Human-readable name, ≤ 256 chars. |
| UUID override | No | tnt-<suffix>, ≤ 40 chars; server generates if blank. |
| Valid until | No | UTC datetime; blank means no expiry. |
Page 2 — OIDC connection (primary)
The tenant's identity provider — usually a Keycloak realm or an Azure AD app dedicated to this tenant.
| Field | Required | Notes |
|---|---|---|
| Issuer | Yes | The tenant IdP's issuer URL. |
| Audience | Yes | Audience claim minted into the tenant's user tokens. |
| Token mode | Yes | Auto / JWT local / JWT userinfo / Opaque introspection. |
| Use OIDC discovery | No | Enable for standard /.well-known/openid-configuration lookup. |
| Discovery / JWKS / UserInfo / Introspection URL overrides | No | Same semantics as the admin OIDC wizard. |
Page 3 — OIDC connection (advanced)
| Field | Notes |
|---|---|
| Introspection client ID / secret | Credentials for the RFC 7662 call. |
| Allow userinfo fallback / introspection fallback | Fall-back behaviour when JWT verification fails. |
| Clock skew (s) | JWT validation tolerance. |
| Connect / read timeouts (ms) | HTTP timeouts. |
Click Finish. The server-side create operation is atomic — in a single transaction it inserts the tenant row, creates the tenant-scope identity provider record, stores the OIDC connection, and seeds two TEMPLATE roles named tenant-super-admin and tenant-auditor that the tenant's own admins can then copy and customise.
10.2 Update a tenant
The Tenant Update Wizard mirrors the Create wizard with the same three pages, pre-filled from the selected tenant. The UUID is displayed read-only on Page 1; every other field is editable.
The introspection client secret on Page 3 follows the blank-keeps-existing rule: leave it blank to preserve the encrypted value, type a new value to rotate.
10.3 Delete a tenant
A confirmation dialog reads "Delete this tenant and all its OIDC bindings and roles? This cannot be undone." On confirm, the server hard-deletes the tenant row; the database ON DELETE CASCADE chain removes the per-tenant identity provider, every per-tenant role, and every grant on those roles in one transaction.
11. Cross-cutting behaviour
11.1 Pagination
Every list surface (Roles, Permissions, Grants, Tenants) uses the same paged query widget. The footer shows:
- the current page number,
- a page-size selector (10, 25, 50, 100),
- the total row count.
Server-side filtering and sorting happen in PostgreSQL; the client never holds more than one page of results at a time.
11.2 Search modes
All four list surfaces share the same query-mode radio buttons:
- WEB — multi-word relevance search. Quotes group phrases;
-termexcludes. - PLAIN — exact substring match.
- ILIKE — SQL
ILIKEpattern with%and_wildcards.
11.3 Status bar messages
Every RPC writes a single-line outcome to the status bar:
| Pattern | Meaning |
|---|---|
Probing server… |
Connection probe in flight. |
Connected to <host>:<port> |
Probe succeeded; the channel is live. |
Failed to connect: <gRPC status> |
Transport or RPC error during probe. The client retries with backoff. |
Server initialised / not initialised |
Result of the is_initialized probe. |
<action>: <subject> (green) |
Successful create / update / delete / copy. |
Failed to <action>: <error> |
RPC returned non-OK status. The dialog stays open so you can retry. |
11.4 Validation
Save / Finish buttons stay disabled until every required field is populated and every format constraint is met (UUID prefix, datetime parseability, etc.). Server-side validation errors (duplicate identifier, foreign-key violation, schema-allowance failure) surface in the status bar after submission; the dialog stays open so you can correct and retry.
11.5 OIDC session refresh
A background timer refreshes your operator's access token roughly 60 seconds before it expires, using the saved refresh token. You will not notice this unless it fails — a failed refresh closes the session and the status bar reads Session expired — re-authentication required. Re-selecting the profile launches the PKCE login flow again.
11.6 Persistence
All client-side state lives in your user-level Qt settings (typically ~/.config/ReefLogic/reeflogic_client_admin.conf on Linux). Specifically:
- Connection profiles under
connection_profiles - Default connection profile id under
default_connection_profile_id - Admin OIDC profiles under
admin_oidc_profiles(refresh tokens are stored in the platform keychain, encrypted under the recovery PIN) - Default admin OIDC profile id under
default_admin_oidc_profile_id - Window geometry, restored on next launch
Quitting the app clears the in-memory PIN cache; saved profiles remain on disk encrypted under their recovery PINs.
12. Day-to-day workflows
12.1 Add a new team member as an admin operator
- Make sure their identity exists in your admin IdP (Keycloak realm
ReefLogicfor the appliance, or whatever you configured in Section 3.2) and that they belong to theplatform-super-admingroup (or whichever group your admin OIDC provider maps to admin permissions). - On their workstation, install the admin client and ensure they have the same connection profile (Section 1) as the rest of the team.
- Have them run Profiles → New profile… and walk the wizard. Make sure they tick Set up recovery escrow and write the recovery PIN down.
- Have them Profiles → [name] → Select to activate the profile. Their first RPC against the server validates the IdP token end-to-end.
12.2 Onboard a new tenant
- Make sure the tenant has its own OIDC realm or app at their IdP, with at least one user and at least one group that will map to a tenant-admin role.
- Open the Tenants surface and click Create.
- Fill in the identifier, display name, optional expiry, and the IdP connection details (Section 10.1). Click Finish.
- The server seeds two TEMPLATE roles (
tenant-super-admin,tenant-auditor) for that tenant. Hand them off to the tenant's own admins; they will copy and customise those roles from their tenant-scope client (which is outside the scope of this admin manual).
12.3 Add a new permission to an existing role
- Open the Permissions surface (Section 8) and identify the UUID of the permission you want.
- Open the Grants surface (Section 9), set the role filter to the target role, click Add.
- Choose the permission you noted, tick the CRUDX bits you intend to grant, optionally set an expiry, click Save.
- Within roughly one minute (the server's authorizer cache TTL), operators in that role will see the new permission take effect.
12.4 Rotate the admin OIDC introspection client secret
- Generate the new secret at your IdP.
- Open the OIDC Settings surface (Section 6).
- Paste the new secret into the Introspection client secret field. Leave every other field unchanged.
- Click Save. The server stores the new encrypted secret and starts using it on the next token introspection call.
- Revoke the old secret at the IdP.
12.5 Migrate to a new admin workstation
- On the new workstation, install the admin client and configure the same connection profile.
- Profiles → New profile… — log in with your IdP identity again. The wizard re-creates the local profile.
- Tick Set up recovery escrow and use the same recovery PIN as on your old workstation if you want a single PIN across all your installs, or a fresh one if you treat each install separately.
- Decommission the old profile by selecting it on the old workstation and clicking Delete.
12.6 Recover from a lost workstation
You cannot remotely revoke a profile that lives only on a lost device — but you also cannot use that profile without the recovery PIN, which the attacker does not have. Your remediation path:
- At the IdP, disable or remove the lost workstation's user session and any long-lived refresh tokens it holds.
- On any working workstation, Profiles → [old profile] → Delete to clean up the saved profile if it was synced from another source.
- Issue yourself a new IdP identity (or rotate refresh tokens at the IdP) and create a new local profile per Section 4.1.
13. Troubleshooting
| Symptom | Likely cause | Resolution |
|---|---|---|
Status bar: TLS handshake failed. |
The server's certificate does not include the hostname you configured, or the trust chain is incomplete. | Verify your connection profile's hostname matches the cert's SANs. Ensure your OS trust store contains the issuer. |
is_initialized probe returns not initialised on a deployed server. |
The server has booted but the bootstrap wizard has not been run yet. | Run Setup → Bootstrap server…. |
Bootstrap wizard fails on Finish with install_secret invalid. |
The install secret you typed does not match reef_init_auth_shared_secret in reeflogic_admin.conf. |
Re-check the value with your deployer. Common pitfall: trailing whitespace or quotes copied alongside the secret. |
| PKCE browser redirect never returns to the wizard. | The IdP rejected the redirect URI, or your browser is on a different host than the wizard's loopback listener. | Confirm the IdP's allowed-redirect-URI list includes http://127.0.0.1:*/*. Run the wizard on the same machine where you open the IdP login. |
Session expired — re-authentication required shortly after login. |
Refresh-token TTL on your IdP is shorter than the access-token TTL, or the IdP has revoked the refresh token. | Tune your IdP's refresh-token policy, or simply re-select the profile to relaunch PKCE. |
Roles / Grants / Tenants surfaces show permission denied. |
Your admin OIDC token does not carry the required roles / permissions. | Check your group membership at the IdP. Confirm the group → role mapping on the server (the platform-super-admin group is the default seed mapping). |
| Editing a TEMPLATE role's Update button is disabled. | Expected. TEMPLATE rows are read-only. | Use Copy to create a CUSTOM role with the same starting permissions, then edit the copy. |
Deleting a role fails with foreign-key violation. |
Grants still reference the role. | Open the Grants surface, set the role filter to the role you want to delete, delete each grant, then retry the role delete. |
Recovery PIN incorrect when selecting a profile. |
You mistyped, or the profile was encrypted under a different PIN on this workstation. | Try again. If you genuinely lost the PIN: delete the profile and re-create it via Profiles → New profile…; you will go through the PKCE login again. |
Next steps
- Return to the Deployment Guide if you need to revisit host configuration or roll out a new server version.
- Read the ReefLogic User Manual for day-to-day usage of the data and survey workflows that consume the tenants you provision here.
- Consult the gRPC and Protobuf API Reference when scripting against the same admin RPCs the desktop client uses (every operation in this manual maps to an
AdminCommandKindenum value).
FAQ
Do I have to use the desktop client, or can I script the admin server directly?
Every operation in this manual is a single ReefAdminService.execute gRPC call with an AdminCommandKind. You can script it from any gRPC client that can present a valid admin OIDC bearer token; see the gRPC API reference. The desktop client is the operator-friendly surface, not the only one.
Can I run the admin client against multiple servers from the same workstation?
Yes. Save one connection profile per server in File → New connection…, then switch between them with File → [profile] → Select. Each profile is independent — different hostnames, different TLS modes, different mTLS certs. Your saved OIDC operator profiles in Profiles → … are tied to the IdP that the currently active server is configured with.
What happens if I lose the recovery PIN?
Your local saved profile becomes unreadable — the refresh token is encrypted under the PIN. You can still log in: delete the profile, create a new one via Profiles → New profile…, and walk the PKCE wizard again. The IdP identity is unchanged, only the local cache is lost. Server-side state (your operator's roles, grants, audit history) is untouched.
Can I edit a TEMPLATE role?
No. TEMPLATE rows are immutable by design — they are the canonical starting points the server ships with (for example platform-super-admin). To customise, click Copy on a TEMPLATE row, supply a new name and template key in the dialog, and edit the resulting CUSTOM role. The copy operation atomically clones every grant from the TEMPLATE.
A grant change is not taking effect for operators in that role. Why?
The server caches authorisation decisions per (tenant, admin-flag) for up to three minutes to keep per-RPC latency low. Grant changes propagate as cache entries expire — typically within a minute or two. If you need an immediate effect, the operator can sign out and back in (their cache key changes on subject-id rebind), or you can wait the cache TTL.
Why does deleting a tenant cascade to its roles but deleting an admin role does not cascade to its grants?
The two cases have different blast radii. A tenant is a logical container — removing it means every per-tenant role and grant under it should also disappear, and the database ON DELETE CASCADE chain handles that atomically. An admin role, by contrast, is shared platform-wide; cascading its grants would silently drop permissions you might depend on. The deliberate restriction forces you to revoke grants first, so you see the topology change explicitly.